
Servicing Information, Spares & Part-Numbers
I've got an original factory workshop manual and owners handbook, both in English-text. I've also got an original factory workshop manual, four (out of six)
partsbooks and an owners handbook all in Japanese-text. I've also got a Kawasaki-USA parts database CD-Rom that cross-references part-numbers across
models. If there's something specific you want to know that's not on here, please get in touch and I'll do my best to help. If anyone out there has any
relevant information that I don't have, please get in touch. Thanks to KR-owners Gerrit, Alfons, Bruno and Dan for kindly providing details of the
documentation as follows :-
| Owners Handbook | '84 KR250-A1 (99922-1311-01), '85 KR250-A2 (99922-1327-01) |
| Service Manual | '84/'85 (99924-1053-01 & 99925-1026-01), Second Edition (99924-1053-02) |
| Assembly & Preparation Manual | '84/'85 General (99931-1064-02), Supplement (99939-1141-01) |
| Microfiche | '84/'85 (99917-1110-02) |
| Parts Book | green 01/03/84 ref. 99911-1089-01 (KR250-A1 frame no. KR250A-000001+ engine no. KR250AE000001+ )
red 16/04/84 ref. 99911-1089-02 (KR250-A1 frame no. KR250A-000001+ engine no. KR250AE000001+ ) black 06/07/84 ref. 99911-1089-03 (KR250-A1 frame no. KR250A-000001+ engine no. KR250AE000001+ ) blue 07/05/85 ref. 99911-1089-04 (KR250-A1 frame no. KR250A-000001-011200 engine no. KR250AE000001-011200) brown 25/03/85 ref. 99911-1101-01 (KR250-A2 KVSS frame no. KR250A-011201+ engine no. KR250AE011201+ ) purple 03/02/86 ref. 99911-1101-02 (KR250-A2 KVSS frame no. KR250A-011201+ engine no. KR250AE011201+ ) |
| Race Kit Manual | '85 (99929-1020-01) |


___________________________________________________
Workshop Manual
I've photocopied and posted out many copies of the workshop manual to KR owners all over the world. I intended to scan it all in and make it available on here but someone somewhere beat me to it. Luckily, before it disappeared offline, I grabbed a copy of everything and have finally got round to uploading it all here. Each chapter is a separate PDF - the quality isn't brilliant and the files are quite large, but it should tell you everything you need to know.
Click here to view the complete Parts Book online.
___________________________________________________
Click here to download the complete Factory Race Kit Manual, courtesy of Dan !
___________________________________________________
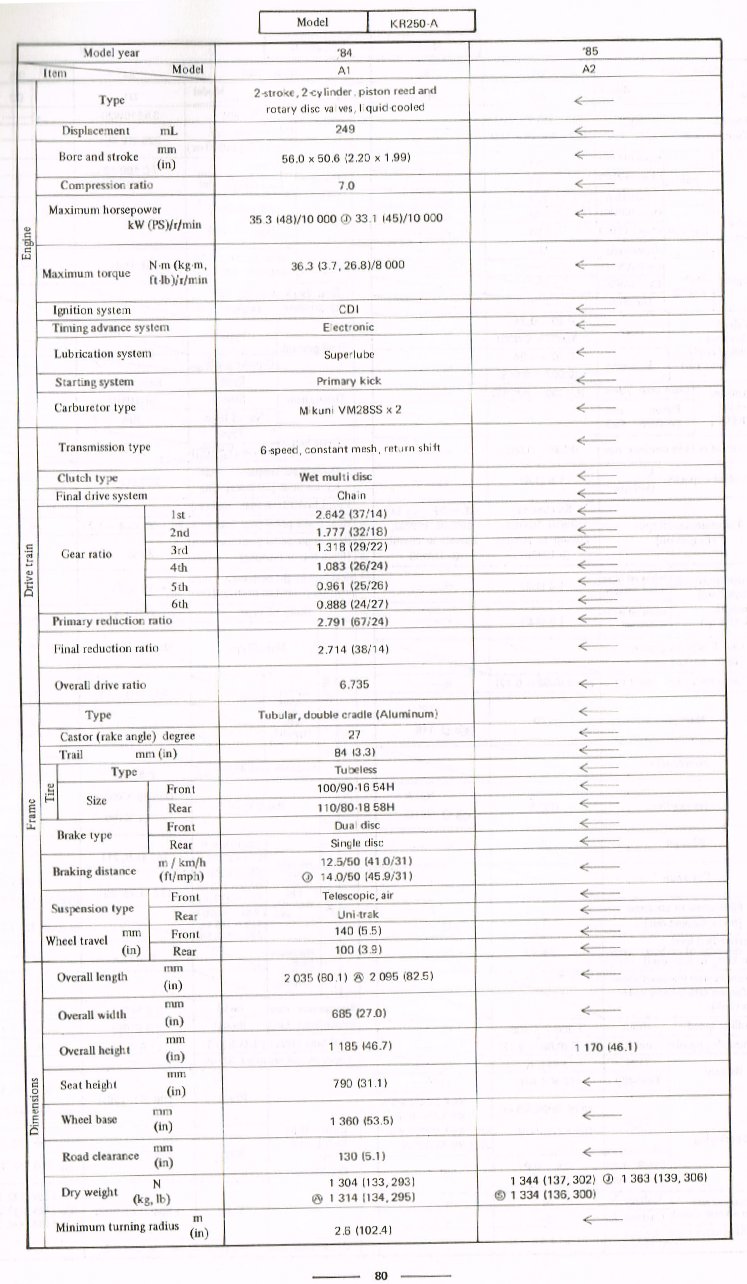
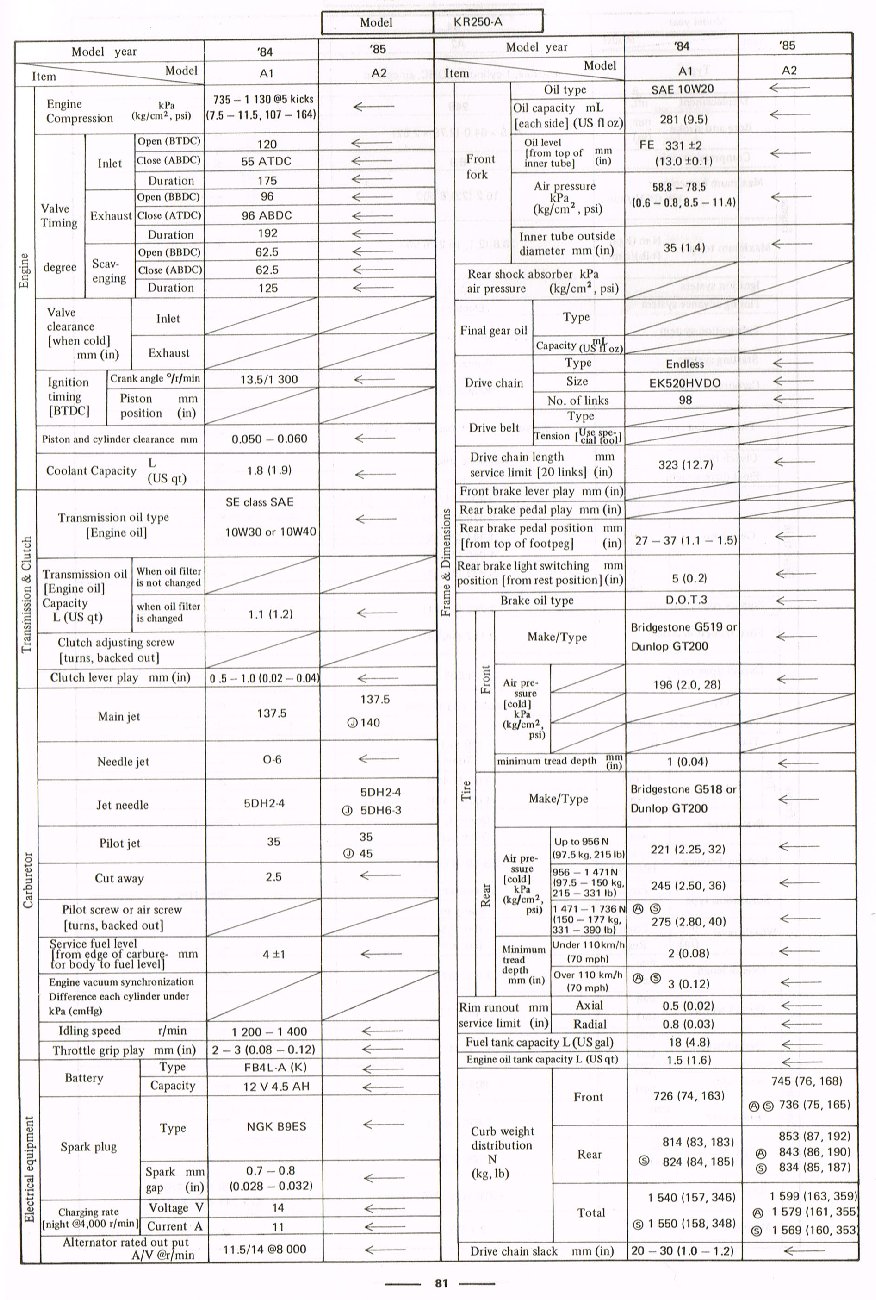
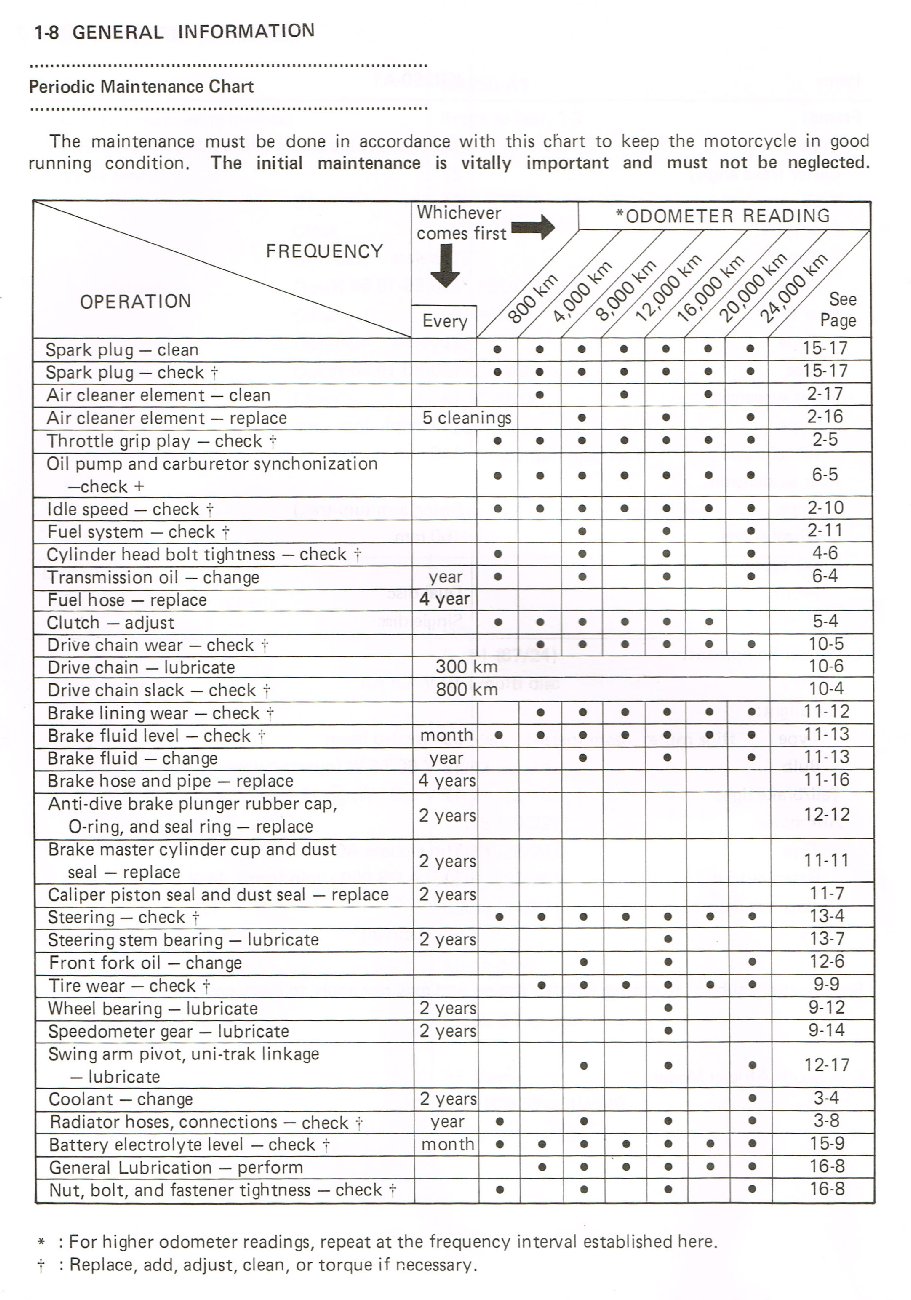
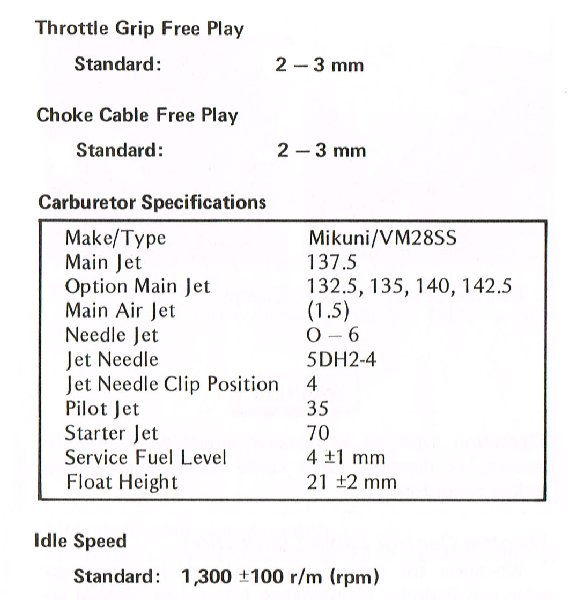
If you can recommend specific tyres, plugs, brake pads, oil etc that work well in your KR, share them with us. Basic service items as listed in the datasheets/workshop manual are as follows :-
| Plugs | NGK B9ES / BR9ES (0.030 gap) | Carbs | Mikuni VM28SS |
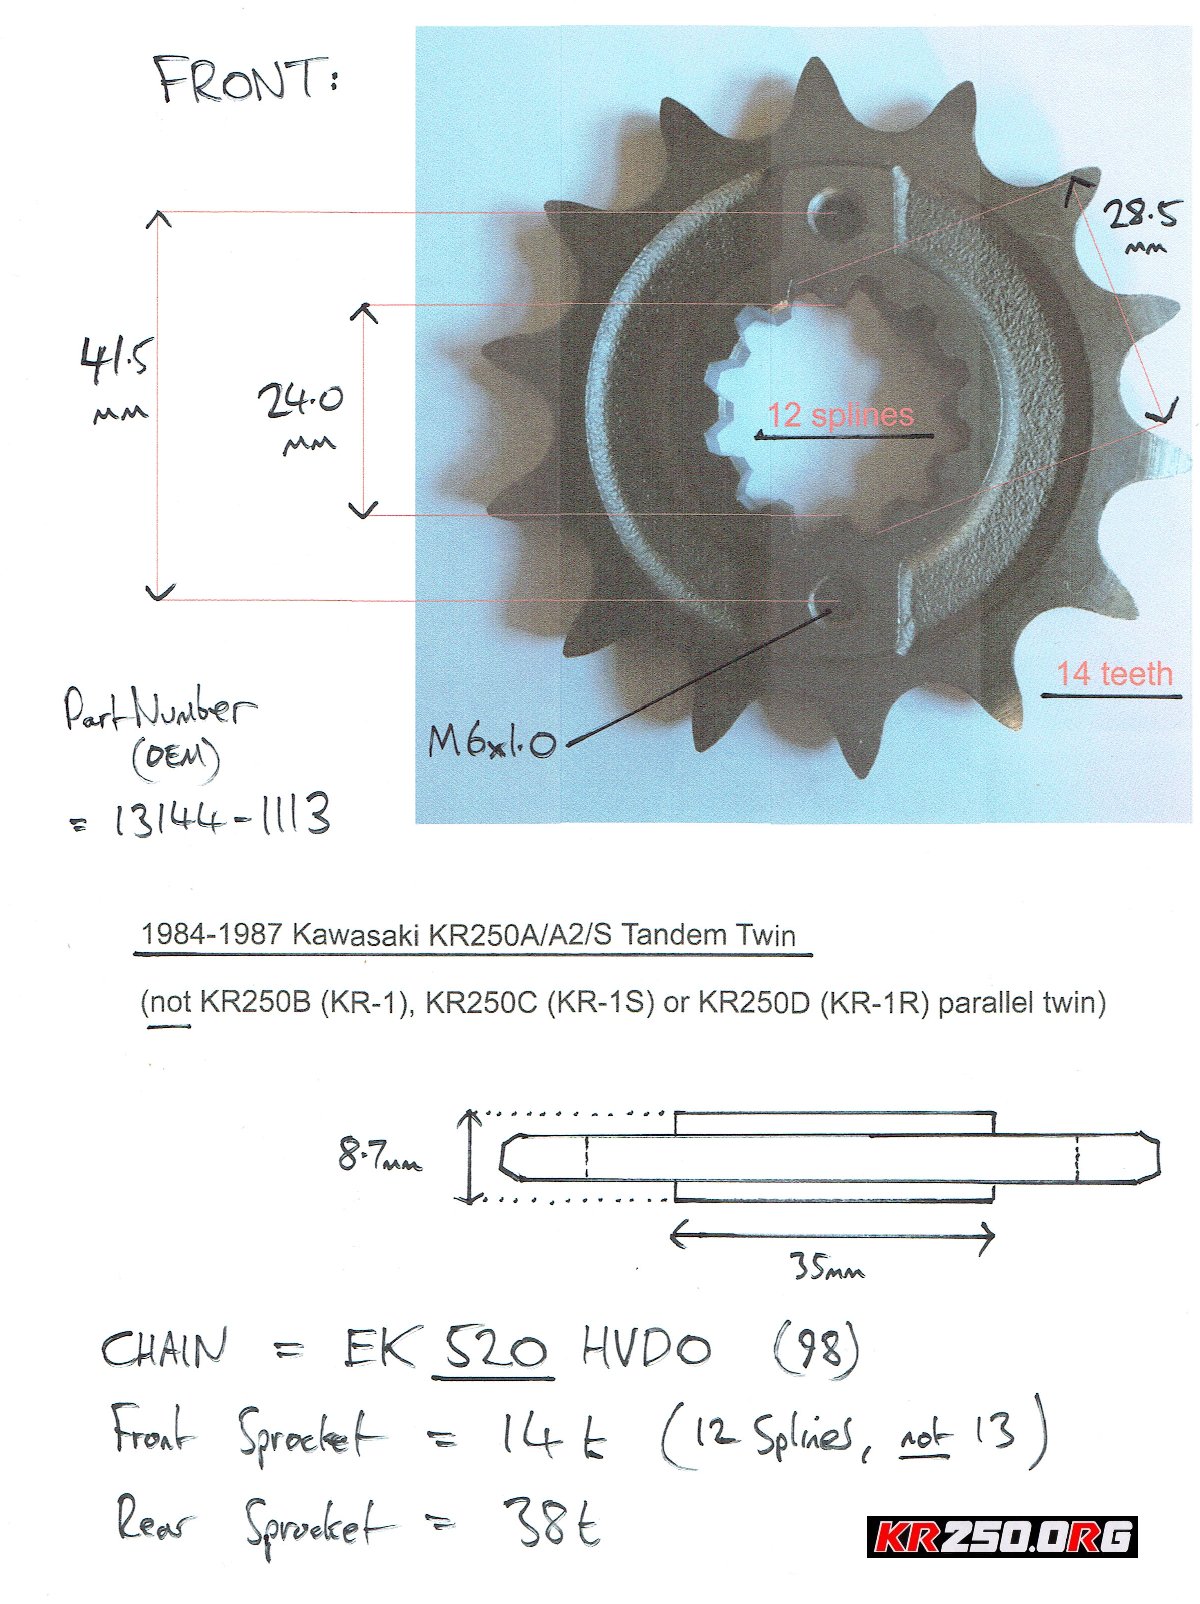
| Battery | FB4L-A : 12v 4.5Ah | Chain & Sprockets | EK520HVDO (x98) & 14/38T * |
| Front Brake Pads | 2306-A3/S1 (Carbon Lorraine) | Rear Brake Pads | 2285-RX/S2 (Carbon Lorraine) |
| VD-425JL (Vesrah) | VD-426-JL (Vesrah) | ||
| E461 (Yamasida) | E465 (Yamasida) | ||
| FDB828 (Ferodo) | FDB339/R (Ferodo) | ||
| FA173 (EBC) | FA85 (EBC) | ||
| Fuel | 18.0 litres | 2T Oil | 1.5 litres |
| Oil | 1.1 litres 10W30/40 | Coolant | 1.8 litres |
| Main/Pilot Jet | 137.5 / 35 | Forks | 281ml 10W20, 8.5-11psi |
| Front Tyre | 100/90-16 54H, 28psi | Rear Tyre | 110/80-18 58H, 36psi |
* Note that the front sprocket is an unusual spec, and many of the aftermarket parts listed online are incorrect, even when they specifically state they
are for the KR250A. It's 14 teeth for a 520 pitch chain, but there are 12 internal spines not the 13 as seen on the KR-1/S etc. Reach out to
Ian on the KR250 Owners Group on Facebook because he's had a batch made.
I'm often asked where you can get hold of spare parts for KR's. It's not as simple as walking into your local Kawasaki dealer although this is definitely worth a try if you're in one of the few countries that officially imported the KR in the
first place (eg. Australia, South Africa). Some parts are still available new from Japan and these can be obtained through a specialist supplier like Z-Power in the UK - note that this mainly includes service items so don't get all excited about ordering up a brand new sidepanel. Some of the stocks of NOS KR parts were snapped up by individuals when Kawasaki dealers were dumping them - sadly I haven't got any but Aussie KR owners should contact Z-Power Australia (no relation) as they obtained a large quantity of NOS items. Otherwise you're stuck with hunting for used parts from breakers, or paying
a fortune for the stuff on Yahoo Auctions Japan . If you can recommend a supplier of new or used parts, please let me know.
Of course, some parts are common to other Kawasaki models so although you might not be able to get a specific bit for your KR, it might be on your dealers shelf for another more up-to-date bike. Therefore it's really helpful if you can provide the Kawasaki part-number when trying to get parts.
I'm trying to compile a list of compatible parts but unfortunately the KR does seem to be a bit of a one-off. I've listed part-numbers and cross-references for some common service items below but please let me know if you are aware of any others or would like me to look up something specific for you :-
| Piston | 13001-1189 (x2) | |
| Rings | 13008-5065 (x2) | |
| Gudgeon pin | 13002-1003 (x2) | KX125 ('74-87) / ZX600 Ninja ('88-93) |
| Small-end circlip | 92036-004 (x4) | KX125 ('74-87) / KDX200 ('83-85) |
| Small-end bearing | 13033-1007 (x2) | KX125 ('80-83) / KDX200 ('83-88) |
| Head gasket | 11004-1120 | |
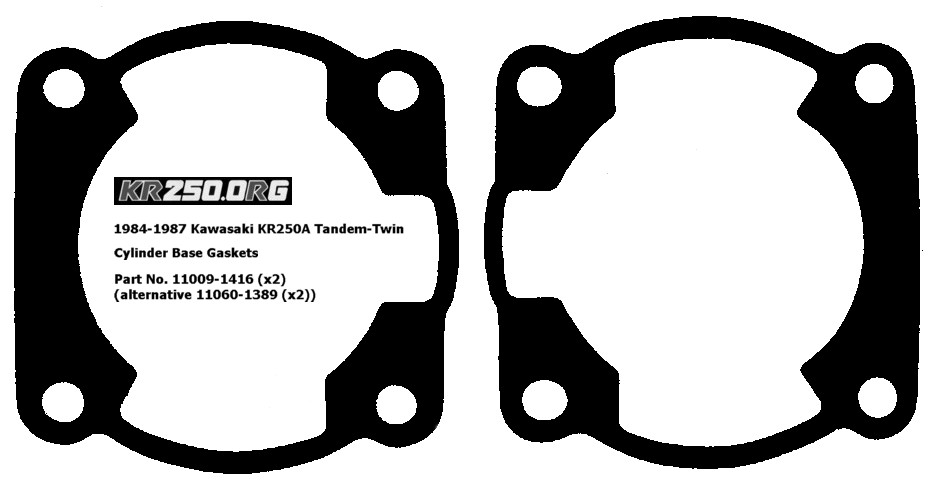
| Base gasket | 11009-1416 (or 11060-1389) (x2) | |
| Exhaust gasket | 11009-1199 (or 11009-1992) (x2) | |
| Clutch cover gasket | 11009-1433 (or 11060-1424) | |
| Primary Gear cover gasket | 11009-1417 (or 11060-1422) | |
| Generator cover gasket | 11009-1418 (or 11060-1423) | |
| Air filter | 11013-1114 | |
| Float valve | 16030-1013 | KX80 ('79-87) |
| Clutch plate (metal) | 13089-026 (x5) | EX500 ('87-98) / ZX750 Ninja ('89-98) |
| Clutch plate (fibre) | 13088-1013 (x6) | EX500 ('87-98) / ZX900 Ninja ('84-86) |
| Cush drive rubber | 92075-1436 | EX500 ('94-98) |
| Front brake lever | 46092-1117 | ZX600 Ninja ('85-96) |
| Front brake pipe (metal) | 32033-1240, 32033-1241 | ZX600 Ninja ('85-87) / ZX900 Ninja ('84-86) |
| Front brake piston seal | 43049-1026 | EX500 ('94-98) / KL650 ('87-95) |
| Rear brake piston seal | 43049-002 | ZX600 Ninja ('85-87) / 750 Turbo ('84-85) |
| Rear brake piston | 43020-1051 | EN450 ('85-90) / Vulcan 1500 ('87-90) |
| Brake disc (front) | 41080-1142 (LH), 41080-1143 (RH) | |
| Brake disc (rear) | 41080-1144 | |
| Steering head bearing | 92116-1052 (x2) | KL250 ('86-92) / KL650 ('87-95) |
| Swingarm/linkage bearing | 92046-1110 (x2/x3) | ZX750 Ninja ('87-98) / ZX-9R ('94-97) |
| Wheel bearing (front) | 601B6202U (x2) | KDX200 ('83-88) |
| Wheel bearing (rear) | 601B6205, 601B6203ZZ, 601B6303ZZ | 750 Turbo ('84-85) / ZX600 Ninja ('85-94) |
| Fork bush | 44065-1065 | KX80 ('86-88) |
| Throttle cable | 54012-1246 | |
| Clutch cable | 54011-1221 | |
| Choke cable | 54017-1056 | |
| Speedo cable | 54001-1101 | ZX600 Ninja ('90-93) |
| Regulator | 21066-1039 | GPZ305 ('83) |
| Mirrors (bar mounted) | 56001-1234 (LH), 56001-1235 (RH) | |
| Mirrors (fairing mounted) | 56001-1258 (LH), 56001-1259 (RH) |
I can't remember who suggested it but someone came up with the brilliant idea of scanning some original gaskets in and putting them on here so that people can print them off (at 100% !) and make their own from ordinary gasket-paper. And I've finally got round to it. Obviously you can't do that for the head-gasket but I've included it anyway as the dimensions may help you find an alternative from another bike if you can't get the real thing.

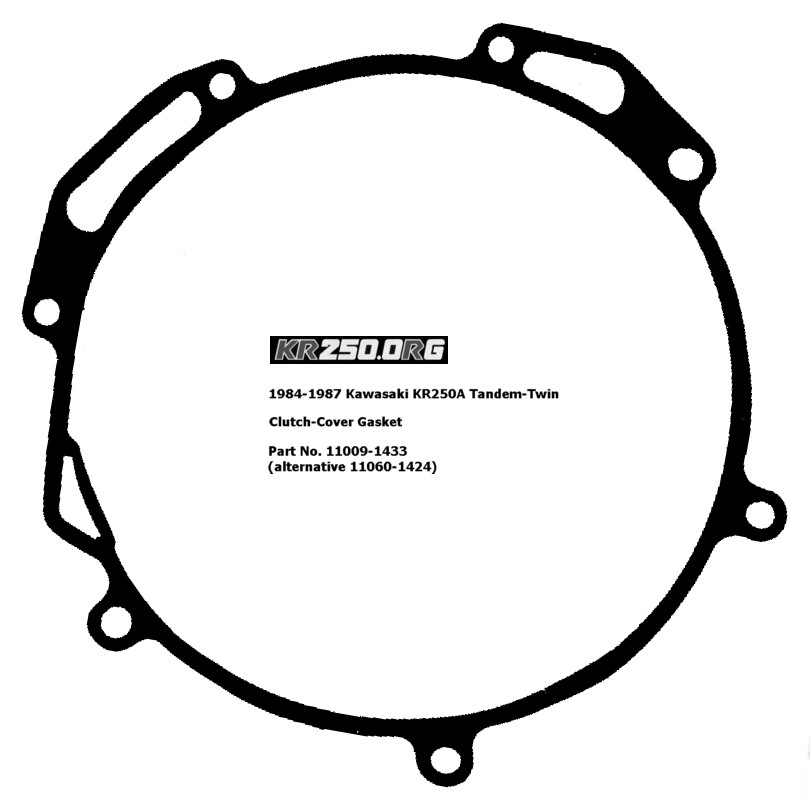
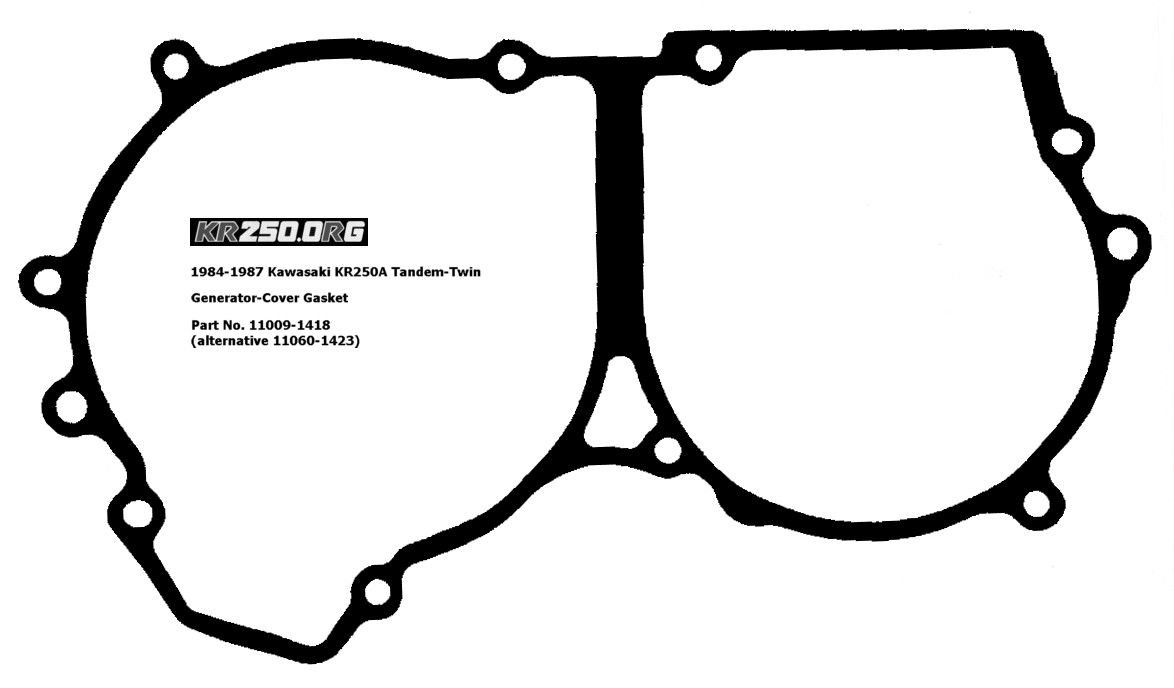
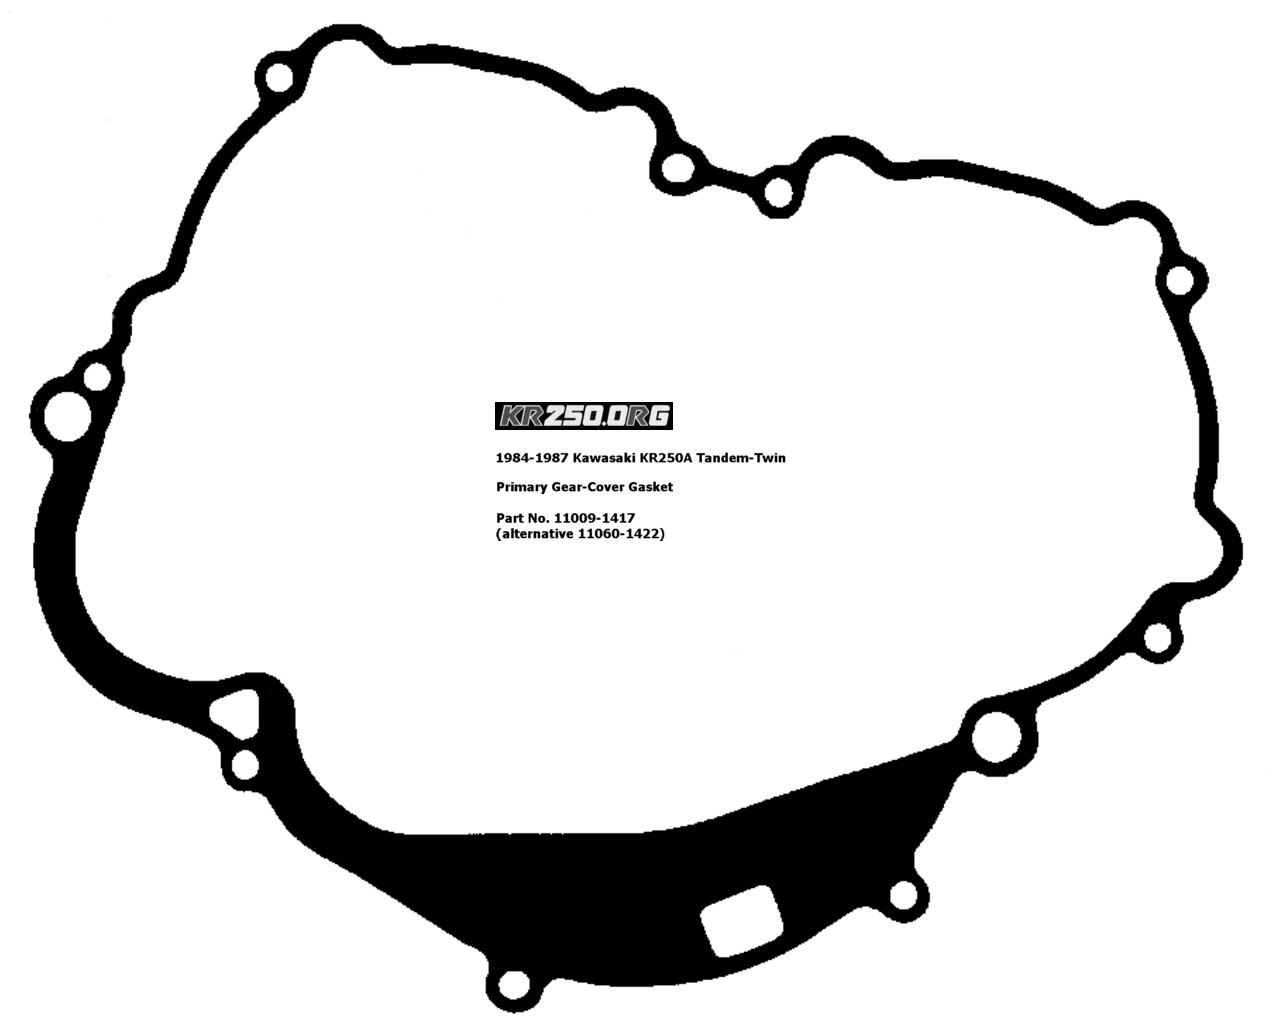
UK KR owner Dan manufactures gaskets for the KR (and other bikes), check out Gasket Guru and tell him I sent you.
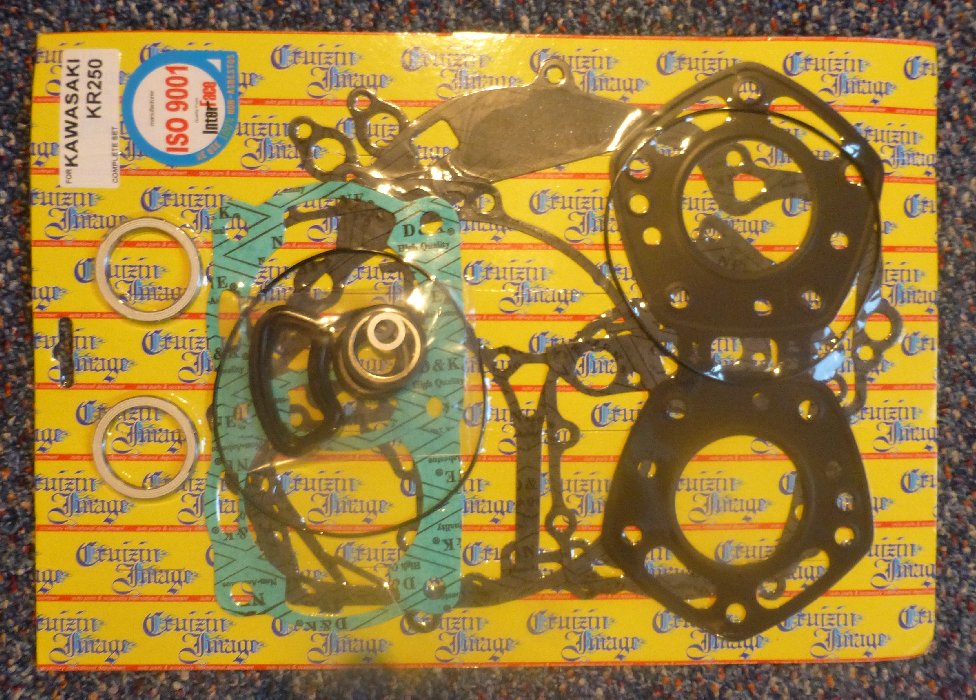
Very comprehensive aftermarket KR250 gasket sets are also available direct from Japan. I ordered one and it arrived in only 4 days, and looks spot on. Look for CruzinImageUK on Ebay.
___________________________________________________
It's very difficult to find new pistons/rings for the KR these days. I've been looking into alternatives and the
best tip so far is to use parts from the KMX125 (but +2.00mm oversize - standard KMX bore is only 54mm). I've
not tried them myself but I've measured some and they appear to be the same in all dimensions. If you try them or you
know of a better match, please let me know.
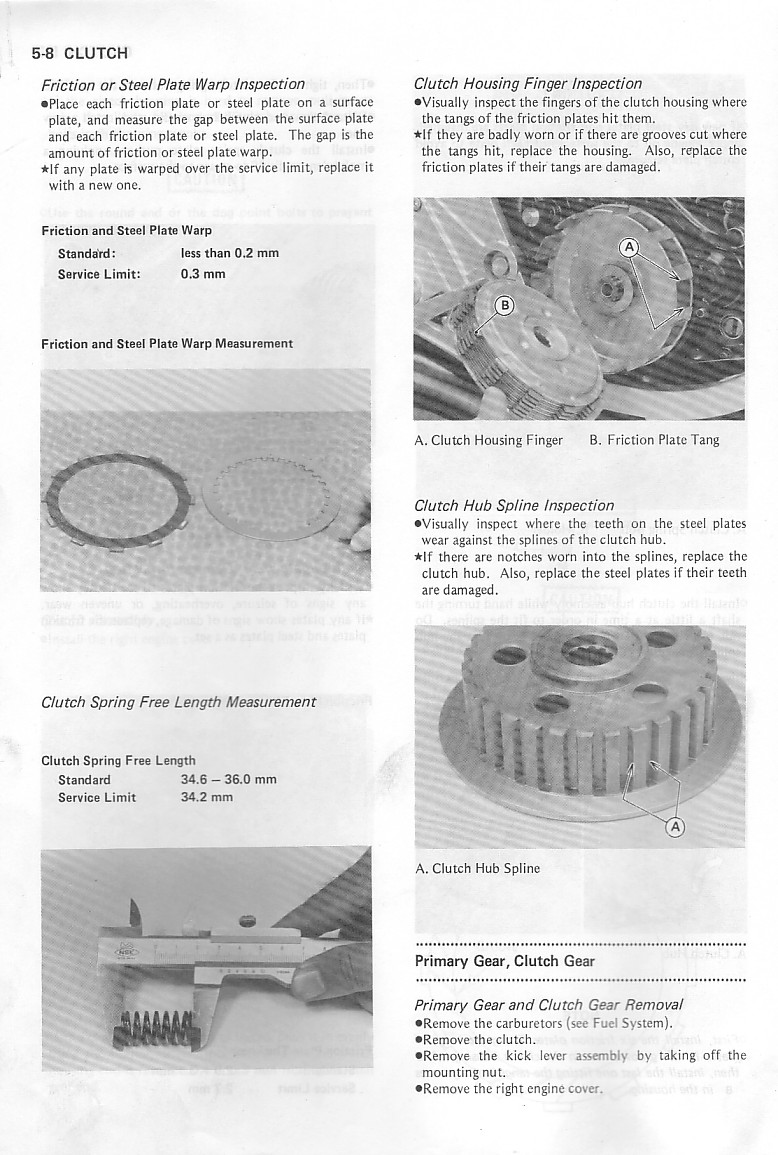
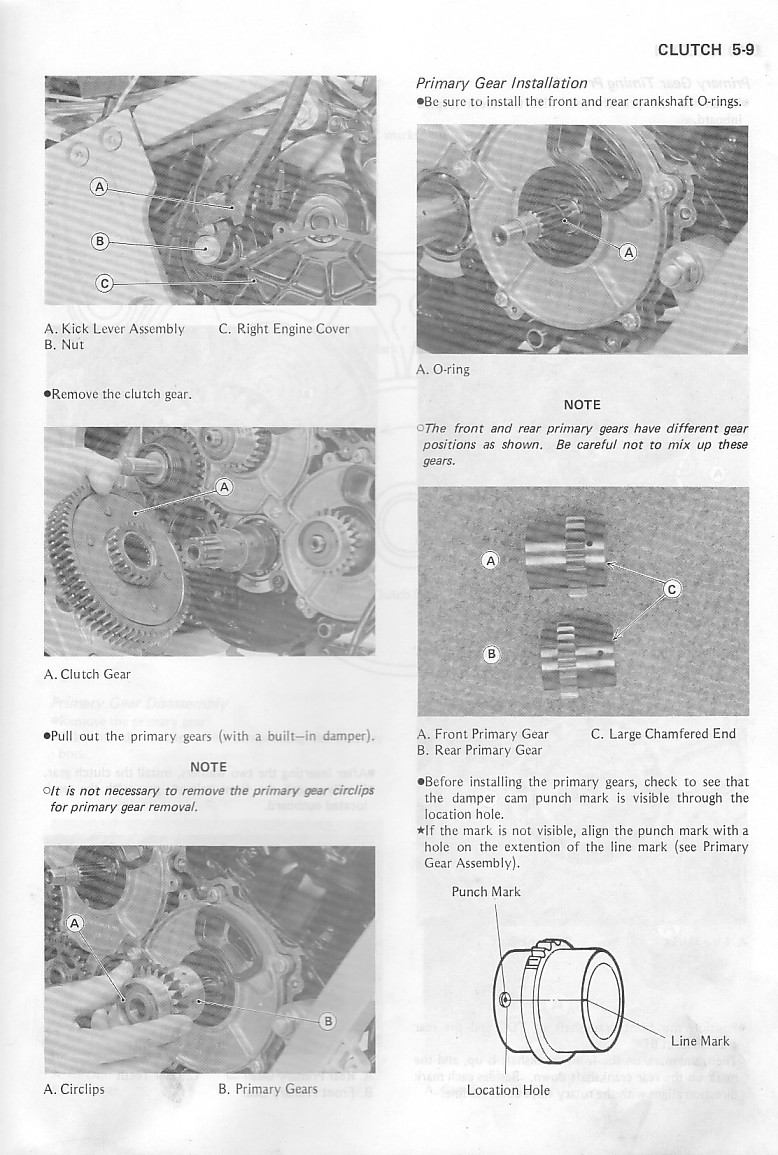
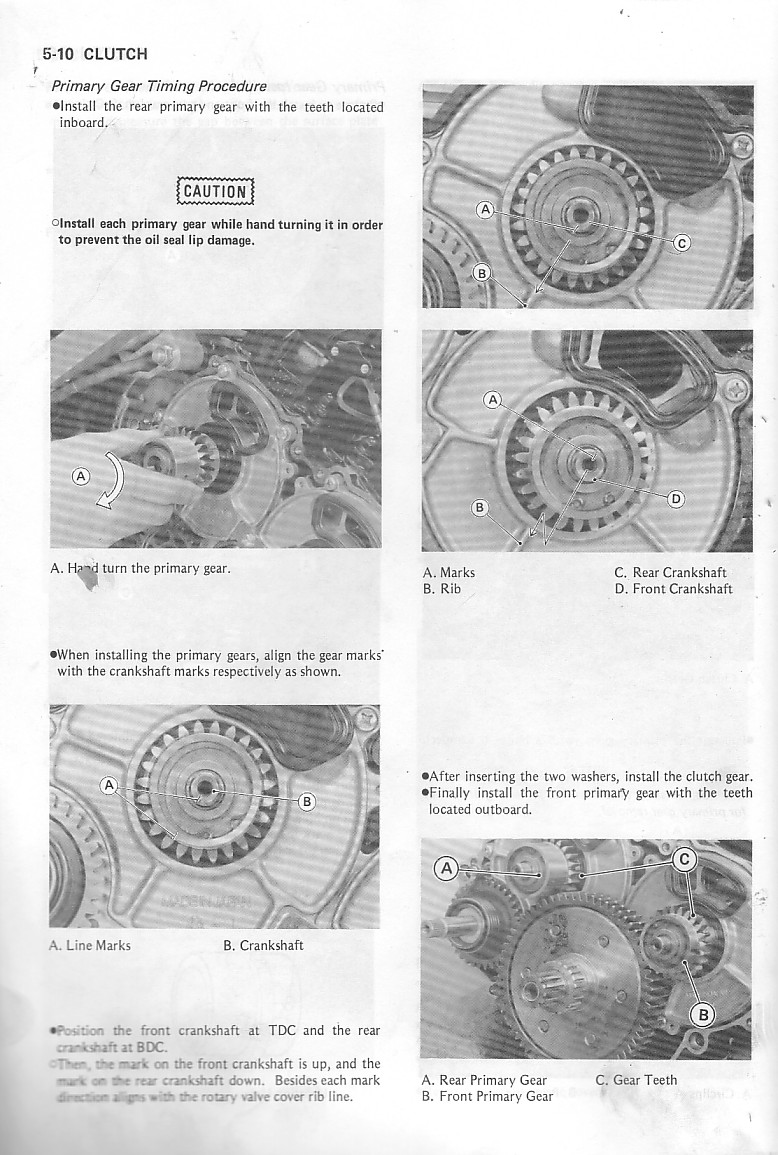
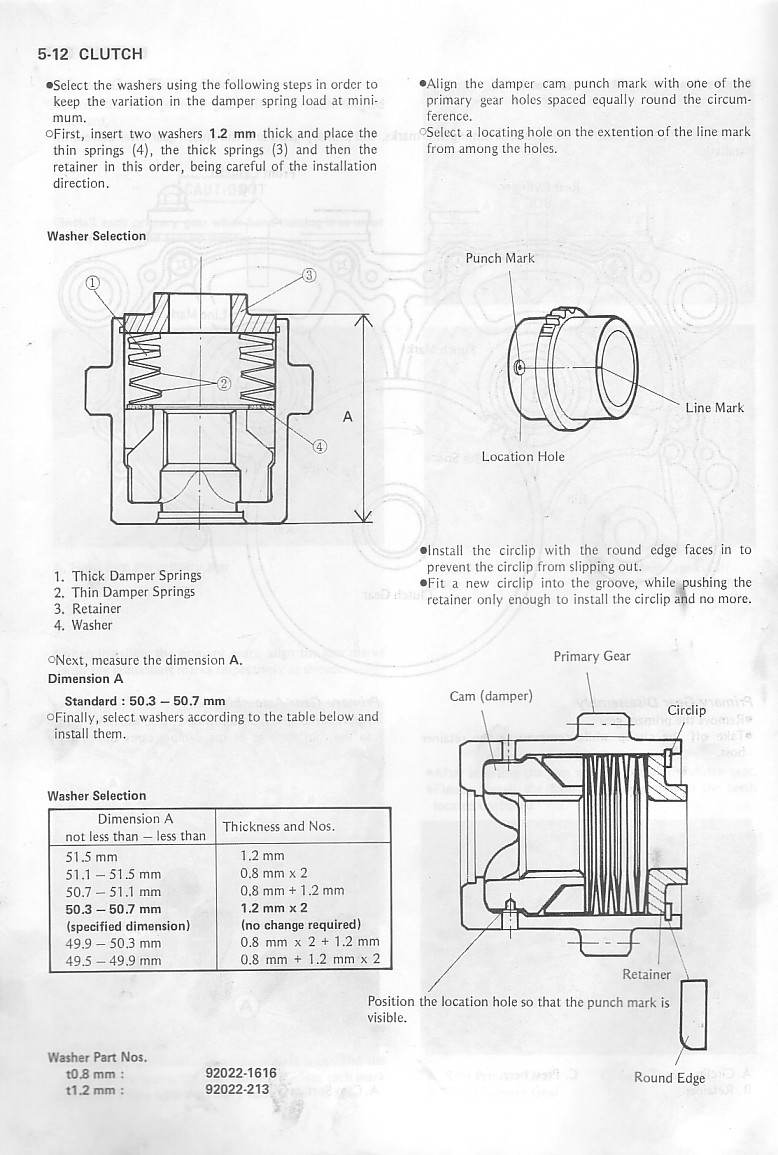
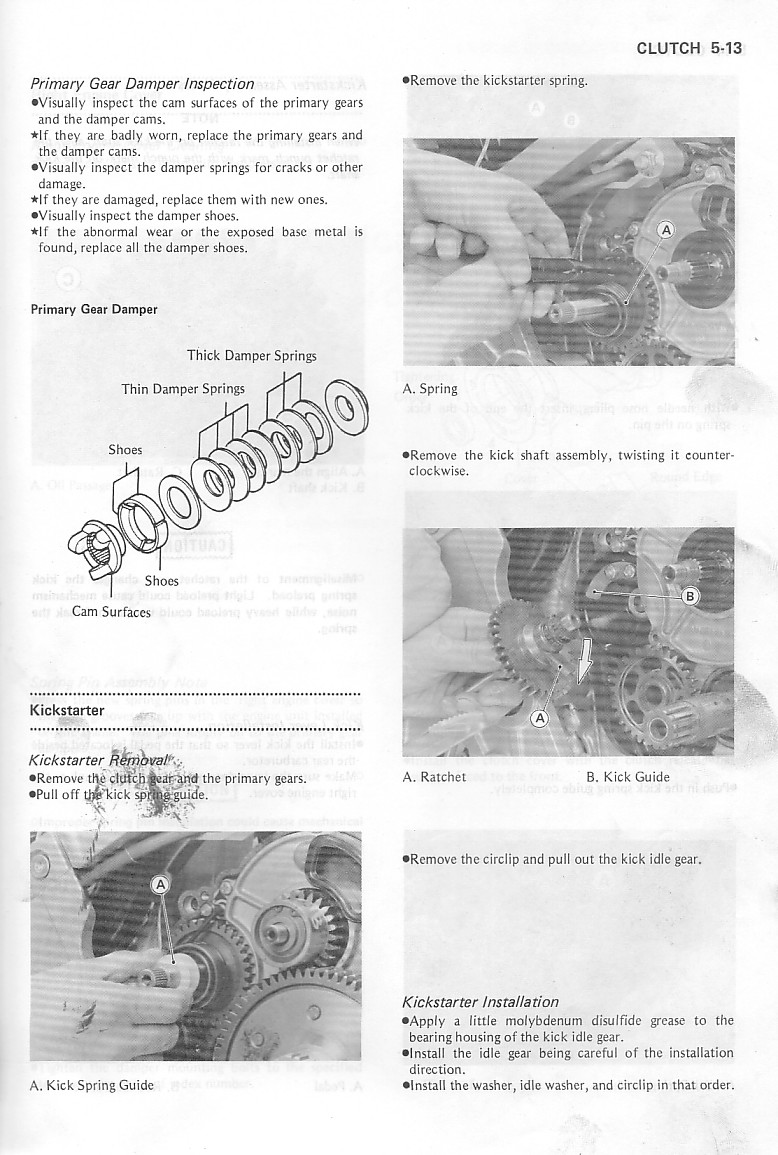
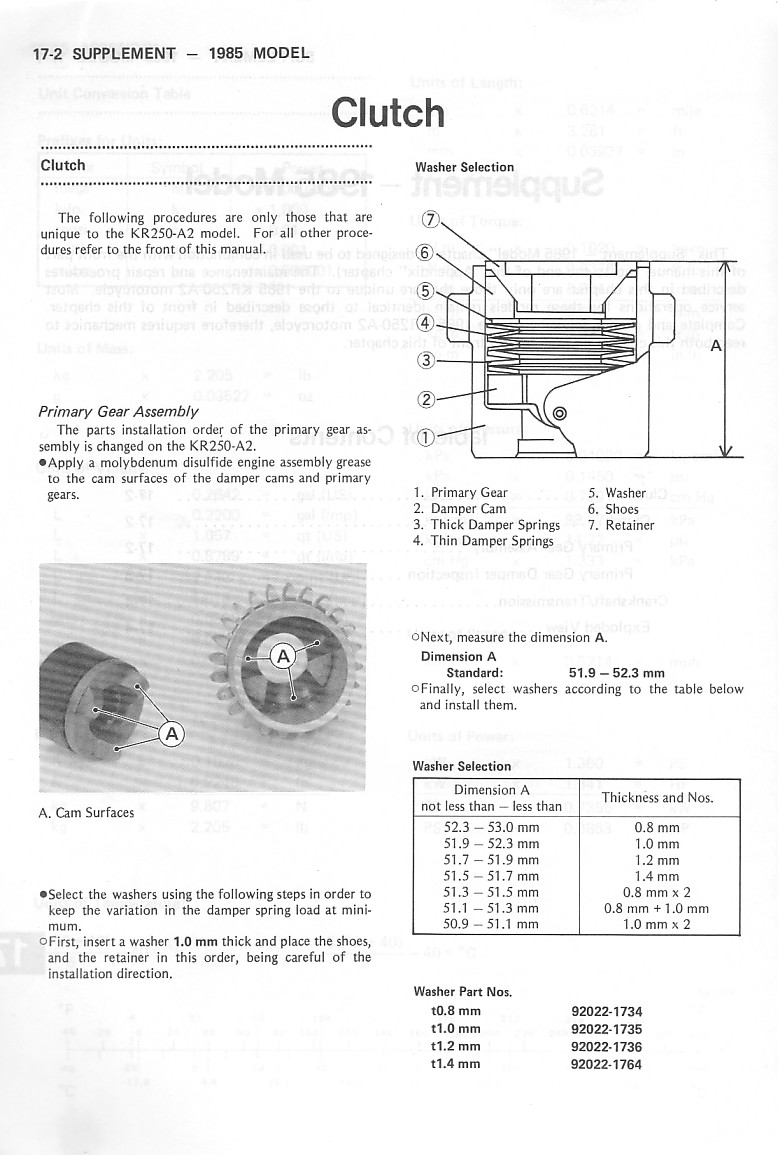
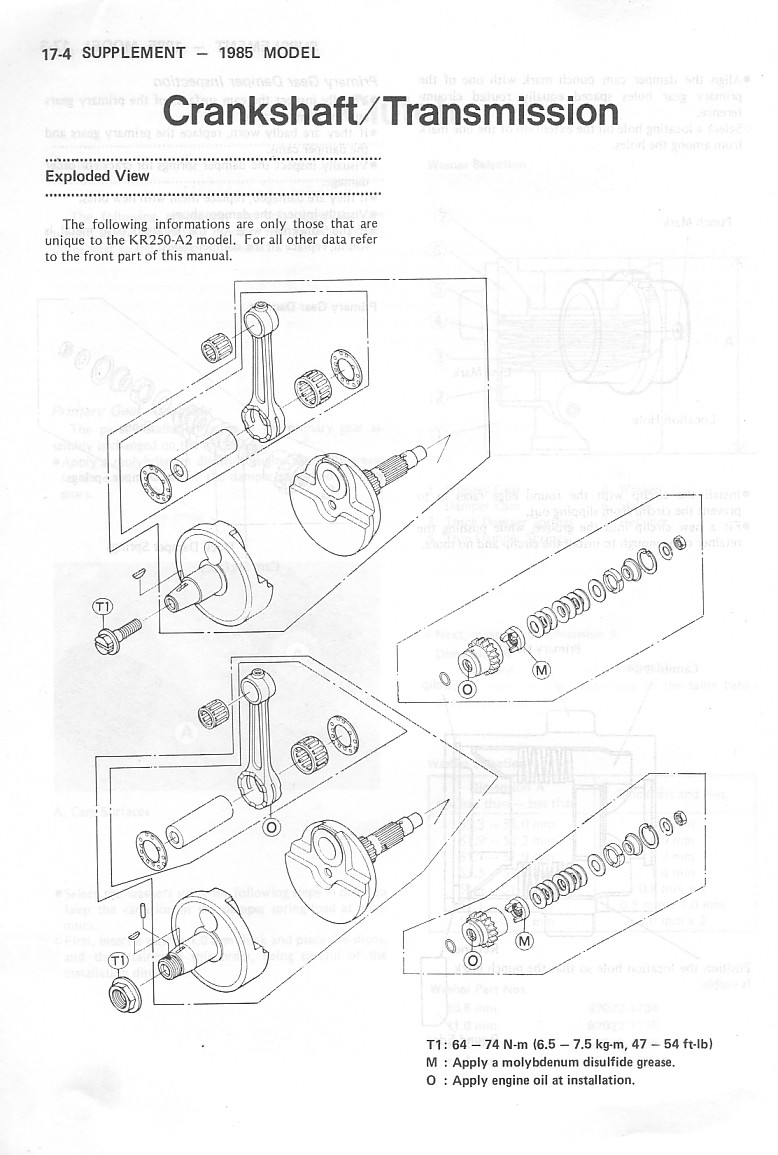
Note that the design of the primary gears was changed for the A2 model, released in 1985. From this point on, a nut
was used to fasten each unit to the crank, and the shimming inside the damper is different. Care must be taken to
ensure you don't confuse the two designs, although I've heard of engines that will run happily with one A crank and one
A2 ! The pages below detail the changes specific to the A2 model.
_____________________
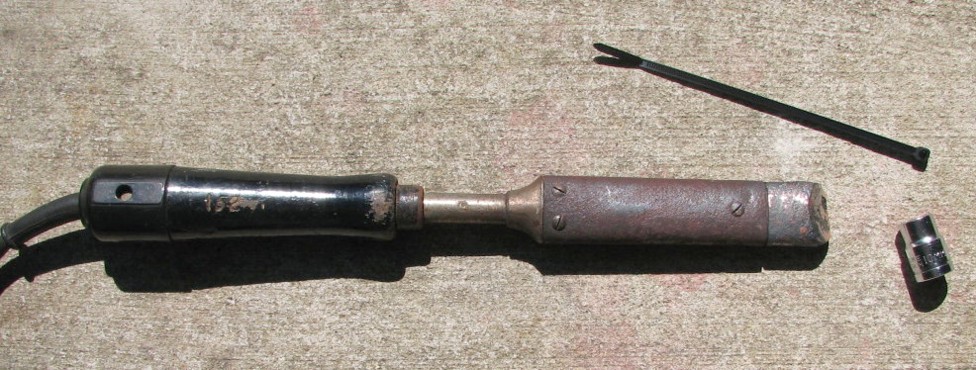
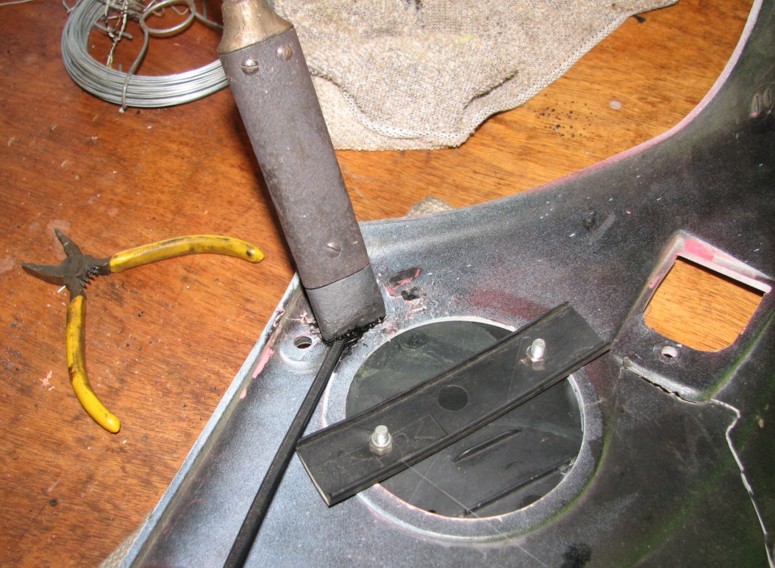
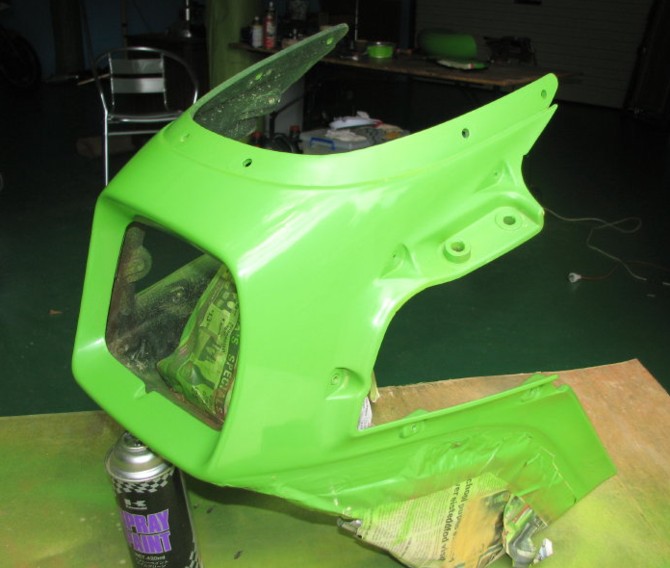
The first step is to clean the area, I used carb cleaner. Support the crack so that it 'wants' to stay together,
using gaffer tape, clamps or brackets as needed. Then starting on the back, apply the edge of the iron directly to
the crack for a few seconds to warm it and soften the plastic (take care not to overdo it), then slip the cable-tie between
the hot iron and the plastic. You should hear a satisfying sizzling sound as the cable tie boils and fuses right into
the body of the panel. Remove the iron as soon as you feel the join is done. Either stop to let that small join
cool off, or move to another part of the crack and work on that in the same way. Don't work in one continuous run or
the heat may build up too much and distort the panel. Tack the crack in several places, then go back between tacks
until it's all done. Don't struggle to make it neat at this stage.
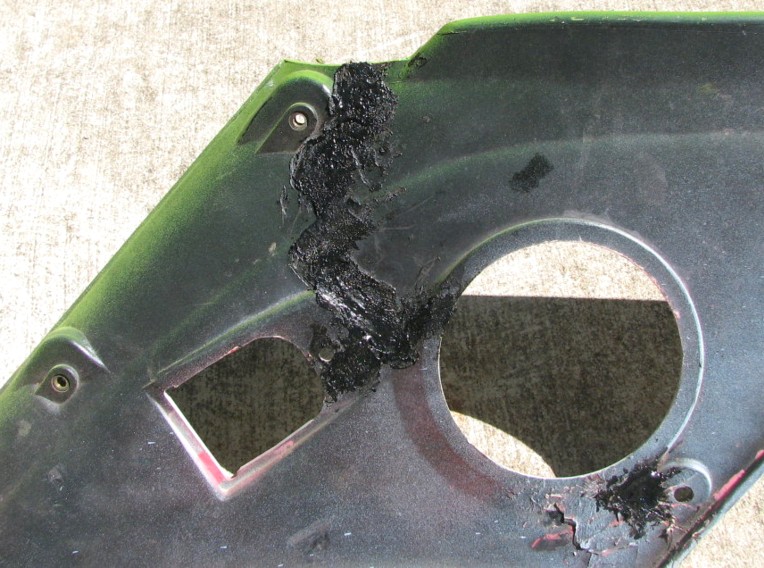
With the back done, turn the job over and remove the tape or other support. Now you need a steady hand. Carve a
'V' shaped groove right along the crack on the 'display' side of the panel. This is to allow the weld to be smoothed
down flush with the original surface. The easiest way to do this is with a grinding disc in an electric drill or
Dremel. With the groove cut, weld it using the same method as before until it's just over full. Again, do it in
short sections to allow cooling. When it's all done, slide the iron flat over the join to smooth it down. You
can do the same to the back if it's on a visible bit. At this stage, it looks messy but it's very strong. Those
who had a grinding disc to use earlier now have an easy time of grinding off the excess. By hand I dread to think how
long it would take as this stuff is TOUGH !
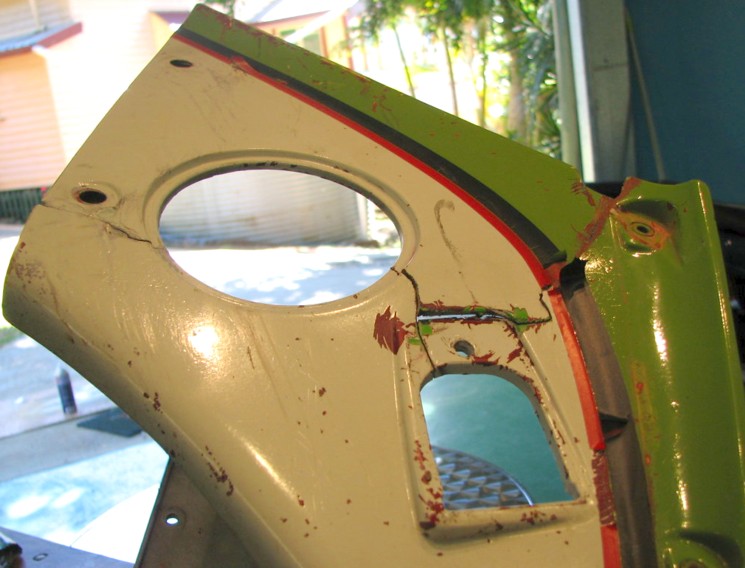
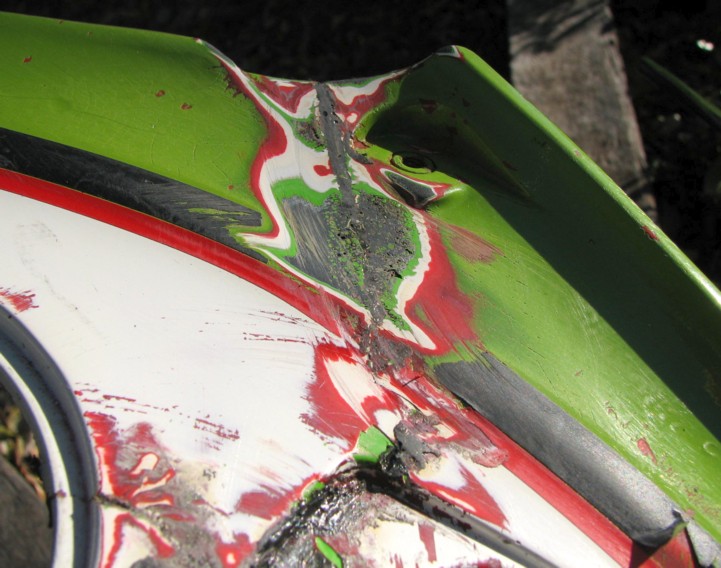
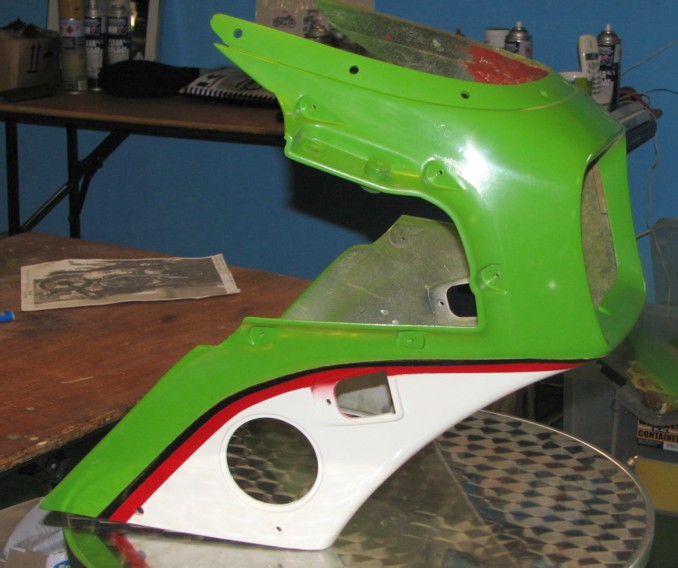
The observant ones will have noticed that the black & red stripes are the wrong way round on this bike ! Once
ground flat, it's a simple job with normal filler, wet or dry rubbing down paper (used wet) and a fair supply of
determination to get to the stage where you are ready for paint. That's another skill in itself of course - my
painting of the red/black pinstriping isn't going too well. I'll need to do it again, treating this first bit as
practice.
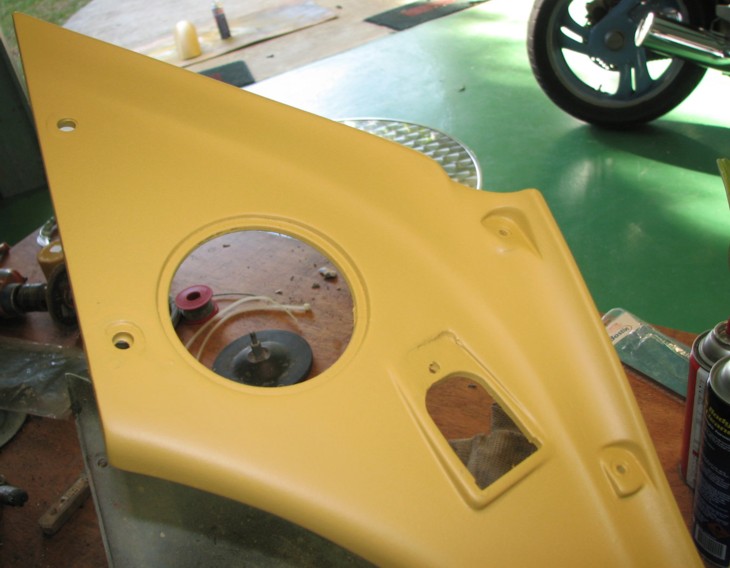
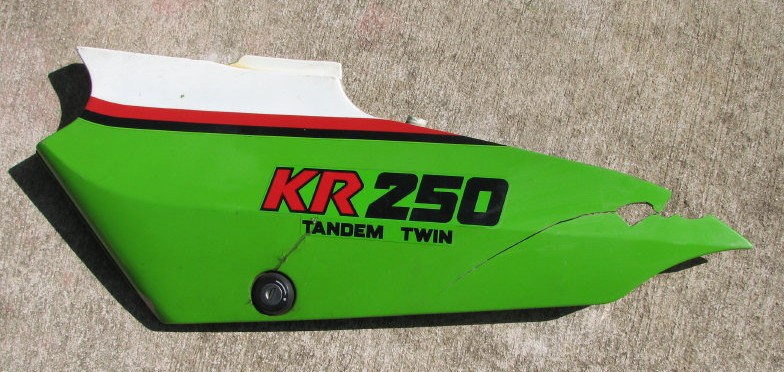
Pleased with my progress, I attacked the other panels in the same way. Note on the LH sidepanel that the locating
lugs and the rear boss have ripped out entirely. I built up the boss using melted cable ties ! The lugs are
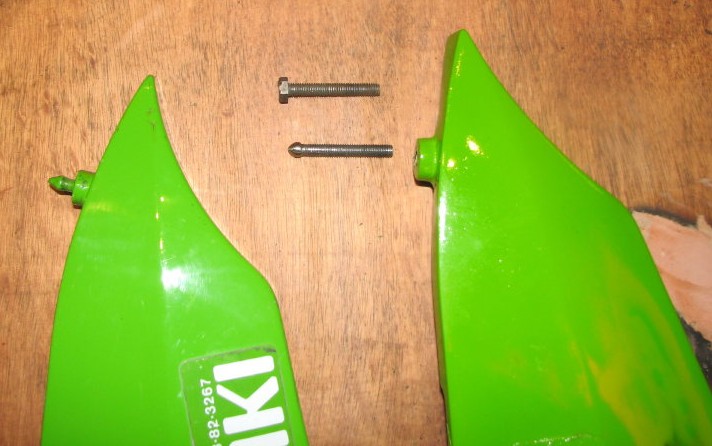
made from filed down bolts. Once done, they plug right in just like the originals, only far stronger.
These front mudguards are from my two KRs. One's been repaired and the other hasn't, yet. But note that the
finished one was actually worse than the other one when I started !
Tech Tips
Here's a few tips and stuff you might find useful keeping your KR running properly. Thanks for the advice sent in already - please get in touch if you can help other KR owners in a similar way :-
_____________________
Most owners I know have more than one KR - a main one and another one used as a potential spares source. Parts are
hard to find these days and you never know when you're going to crash it or blow it up, so if you come across a cheap but
salvageable bike in a breakers I'd suggest you buy it, just in case. The same is true if you spot someone selling a
few used KR spares - I'll be happy to help you sell them on through this site if you don't need them for yourself.
_____________________
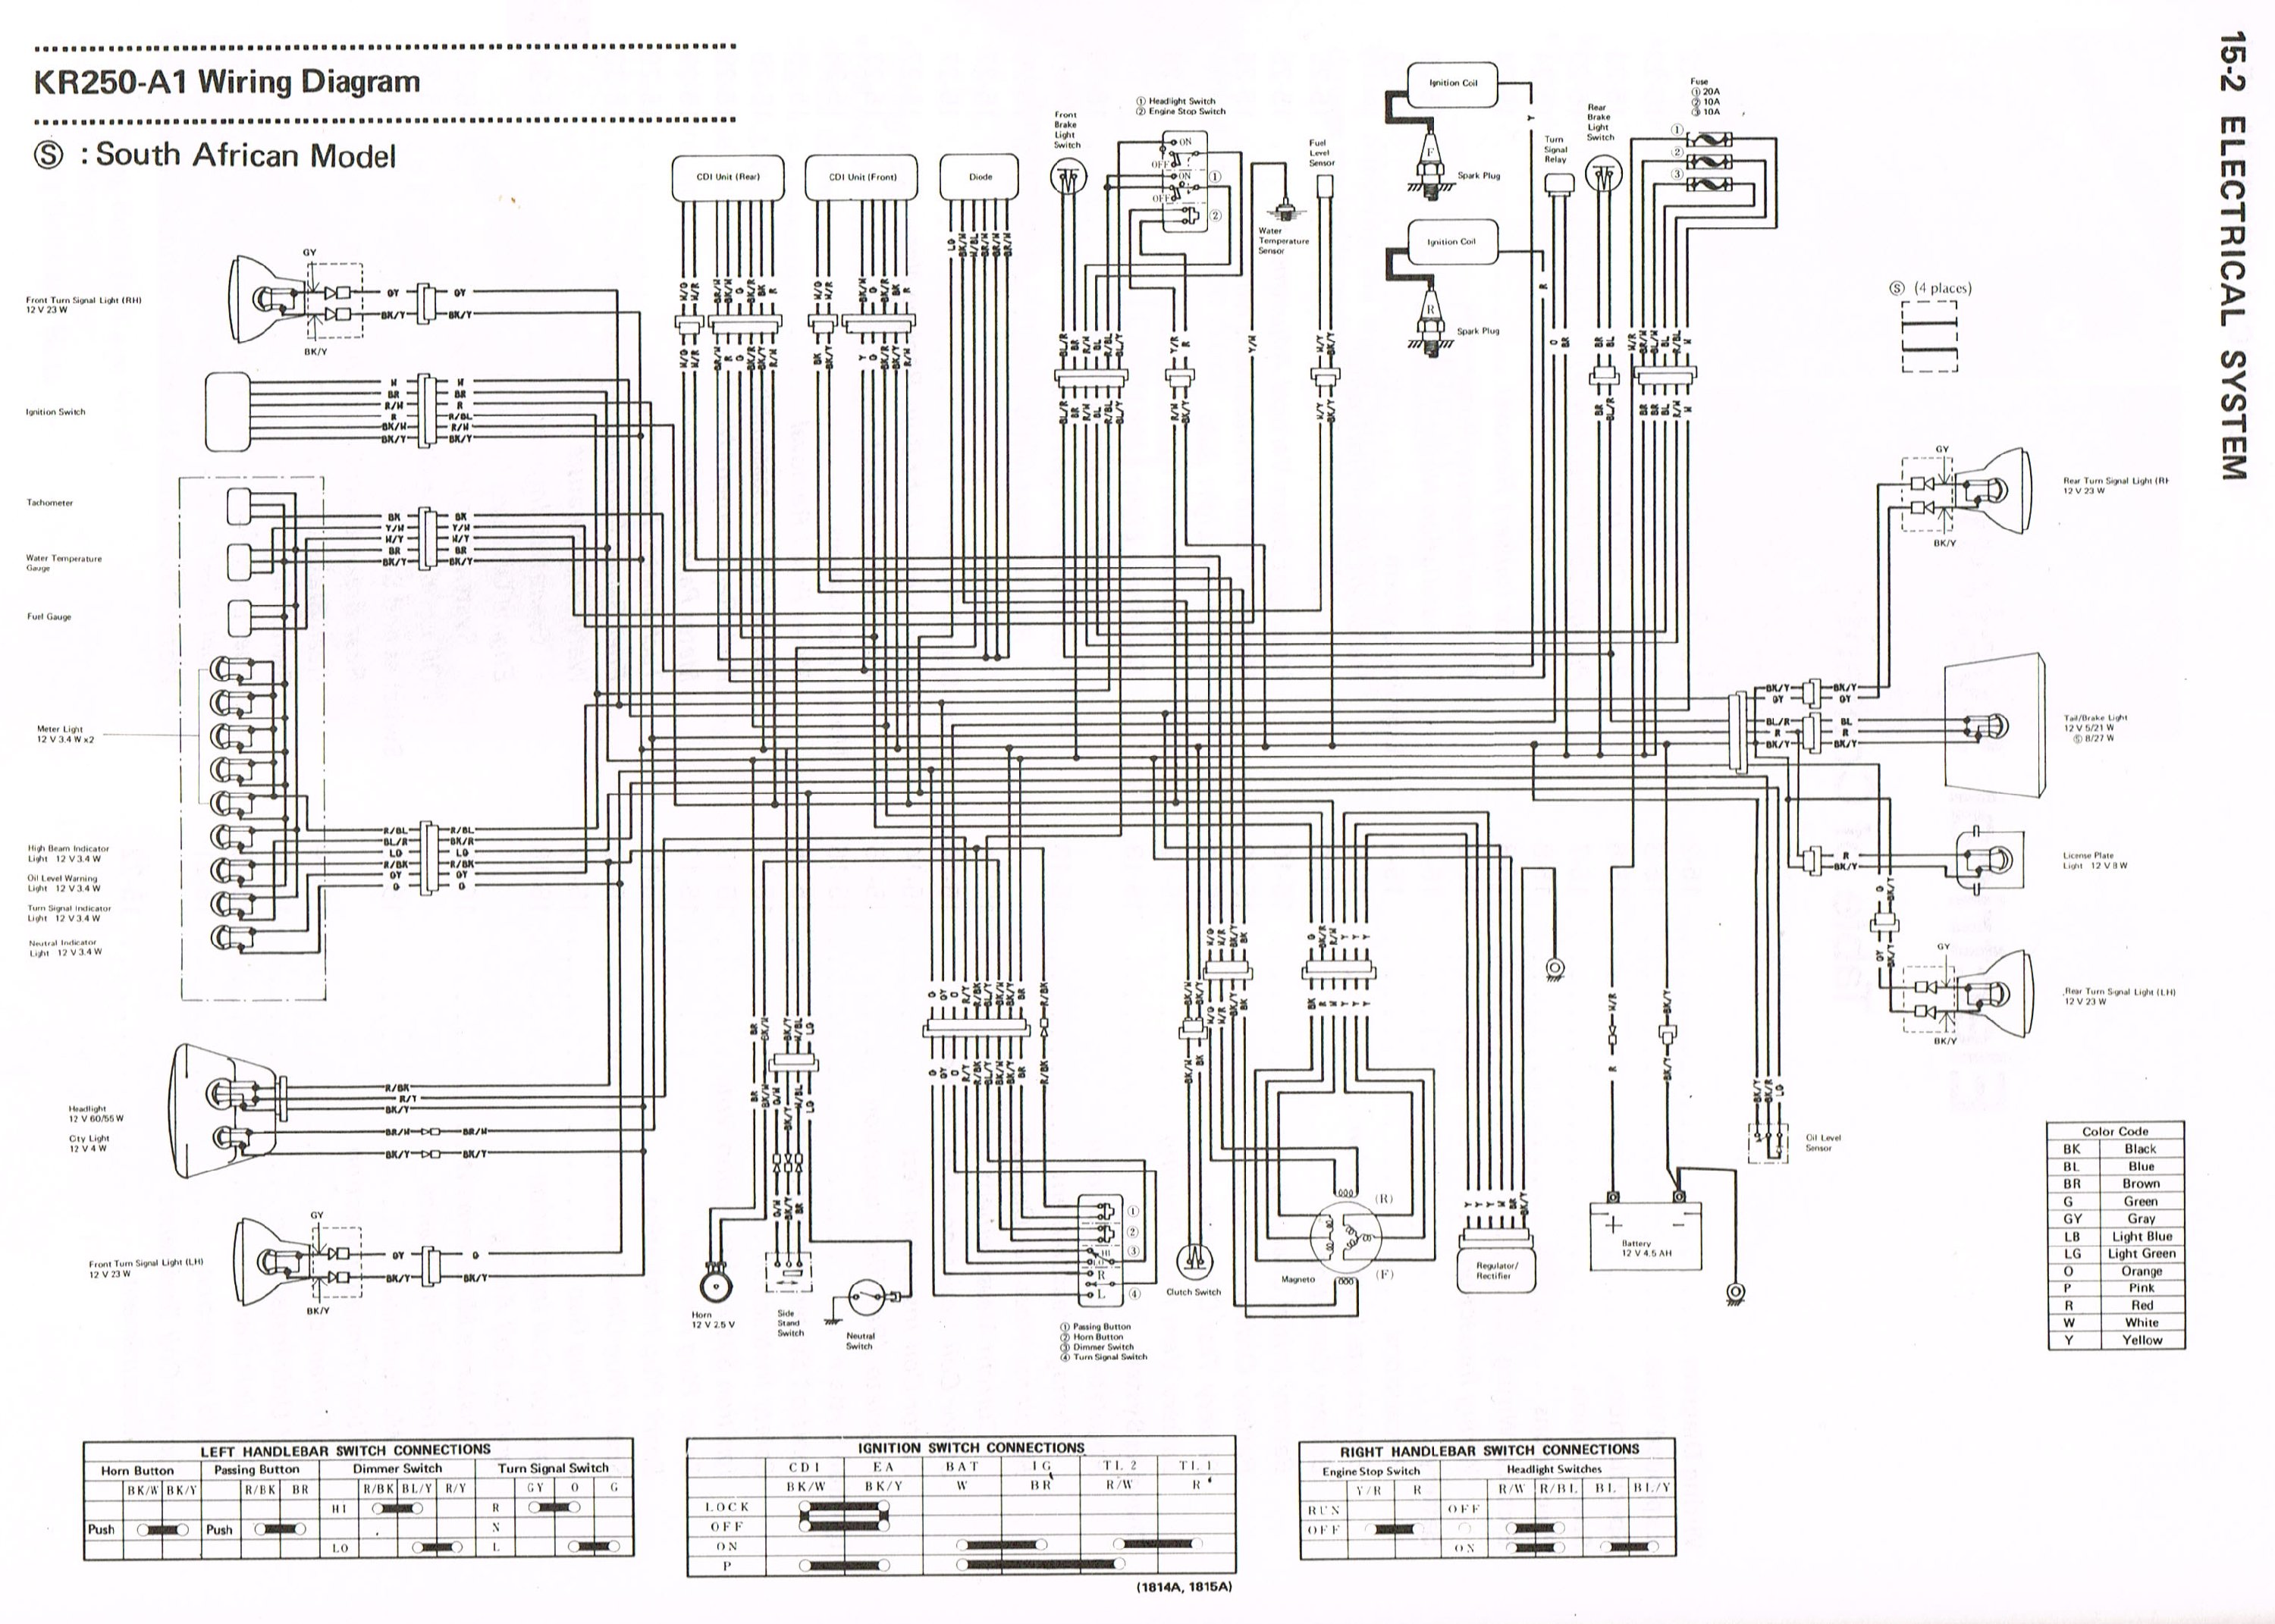
The KR has two separate CDI units - one for the front cylinder (mounted on the right hand side of the bike, with a white connector block using 5 pins) and
one for the rear (mounted on the left, red connector with all 6 pins). That extra pin is for the brown/white wire which is used to provide the
safety cutout for the sidestand/clutch switches. Therefore, they're not officially interchangeable, but with a bit of thought you can make them
work. The front/rear coils also have different part-numbers but I think the differences are just in the mounting bolts.
The partnumbers for the CDI units changed over the life of the model, as follows :
KR250-A1 (1984) : 21119-1157 front / 21119-1158 rear
KR250-A1 (1985) : 21119-1135 front / 21119-1141 rear
KR250-A2/S (1985) : 21119-1175 front / 21119-1176 rear
KR250-A2/S (1986 up to KR250AE012172) : 21119-1175 front / 21119-1176 rear
KR250-A2/S (1986 from KR250AE012173) : 21119-1182 front / 21119-1183 rear
What are the differences between all the various units ? No idea ! Presumably tweaks to the ignition curve, especially on the 'S'.
_____________________
As with a lot of other performance two-strokes, the cylinder bores are nikasil-plated. This means that a good
old-fashioned rebore to the next size is not possible. If your bore is badly damaged, the options are a new barrel (if
you can find and afford one), a used barrel from a spare engine (see Tip No.1 !) or to get your barrel re-sleeved properly at
an engineering shop. Chris of Netbikes in
Australia knows of someone who still has some KR sleeves left.
_____________________
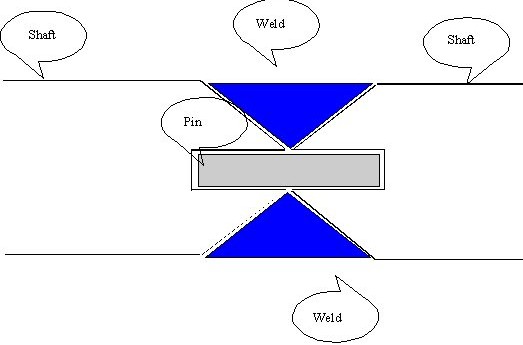
A snapped kickstart shaft is a common KR problem. They're difficult to repair but not impossible. Fred fixed his by tapering and drilling the broken ends, joining them with a hardened steel pin, then welding the joint using special 'RSP'
rods and machining back to size - see Fred's diagram for more details.
_____________________
_____________________

There was an original factory single-seat option that could be ordered with your new KR. It replaces the pillion seat and is easy to fit. I got one from a breakers yard in Australia and another from Yahoo Japan but they're not that easy to find. The fitting kit suggests that the more common GPZ400R (and 600R?) uses the exact same part but I'm not sure about this.
Another tip from Fred : he found two separate problems with his anti-dive system - first the internal plunger had seized so
the anti-dive was permanently 'on', secondly the adjuster knob was slipping and not actually turning the nut
underneath. I later found both of these to be true of my KR too - it's definitely worth checking yours to see if
they're working properly. Strip the units, clean them and set them to '1' (minimum), or just toss them in the bin and
fit a blanking plate instead.
_____________________
If you're rebuilding the top-end, make sure you fit the pistons with the direction arrow pointing towards the exhaust port,
just like on every other bike. But try and remember that the rear cylinder is backwards on the KR ! This tip is
brought to you courtesy of the ex-Kawasaki mechanic who previously owned my bike...
_____________________
To remove the rear exhaust, you need to detach the rear subframe. However, as long as you remove the battery box and
loosen the rear mudguard, you can get enough clearance to extract the pipe without disconnecting the oil tank, wiring and all
the other bits that the manual tells you to.
_____________________
You can't remove the engine from the frame in one piece, it physically won't fit. You're supposed to remove the
entire top-end, though some people apparently leave one of the barrels in place. You could maybe save yourself the
cost of a new head gasket by removing the head and barrels as one unit ? Luckily, I've not had to try this yet...
_____________________
If you remove the rear shock, it's easy to get the damping misaligned. To reset it, set the damping knob to '1' and
then rotate the entire damping adjuster unit and cable until the red line painted on the white plastic cog is visible in the
middle of the window on the shock body. Then refit it making sure not to turn the unit as you're doing it.
_____________________
The handlebar clamps on a KR are a bit of a weak point - if you crash the bike, chances are it'll be the bar clamp that
snaps. Bizarrely, the left one is still listed as being available new from Kawasaki but the right one
isn't ! Apart from trawling the breakers yard what can you do ? Well, other Kawasaki's of the same era had
similar bar clamps, maybe they fit ? Some secondhand GPz900R clamps and bars came up on Ebay so I bought them to
investigate - sure enough, they look the same but the mounting holes are fractionally out and of course the KR forks are
35mm and those on the 900 are 38mm. But if you slot the mounting holes slightly and get them sleeved to fit your
forks, you should be able to get your crashed KR back on the road. And GPZ600R ones (37mm) look like they'd fit
too. Let me know if you've actually done this or have found another model that fits too.
_____________________
_____________________

Why does only one of the fork tops have an air valve ? The manual recommends pressurising the forks to anywhere
between 8.5 and 11psi. You should do this carefully using a hand pump, not a garage air-line. The forks are
connected - that strange bracket above the bottom yoke actually conceals a 3mm hole drilled in the fork leg, and equalises
the pressure between the two - see the photo below (but ignore the bent stanchions !). Needless to say, this bracket
needs to maintain a good seal on the fork legs and you should take care when removing or refitting it. The GPZ600 has
a similar set-up with the air-valve actually part of the bracket itself - they're not interchangeable with the KR though
because of the wider diameter fork legs.
_____________________
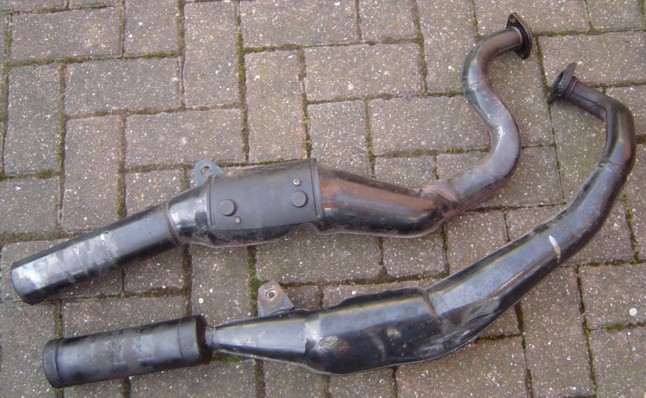
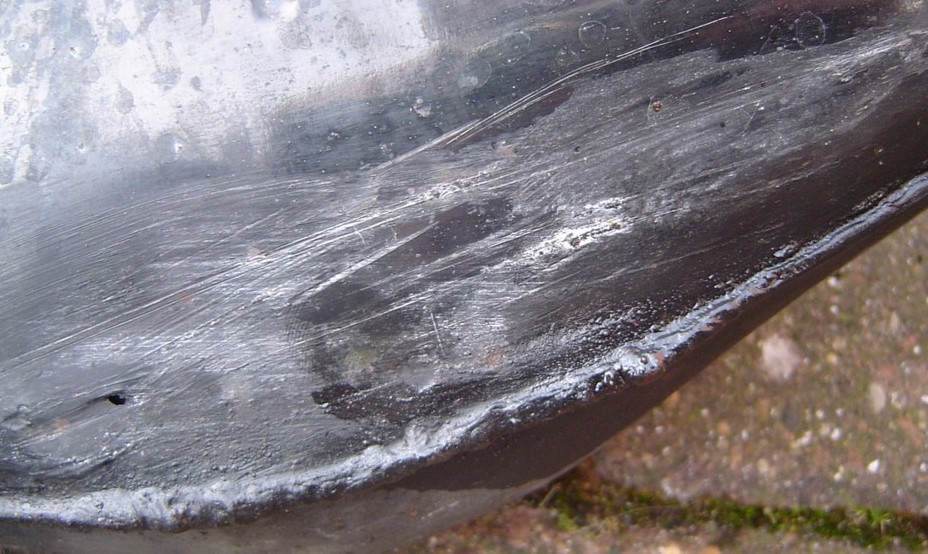
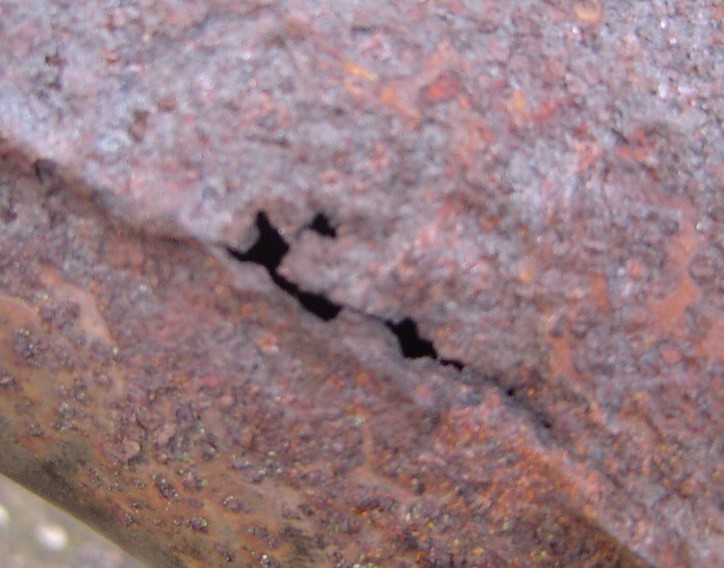
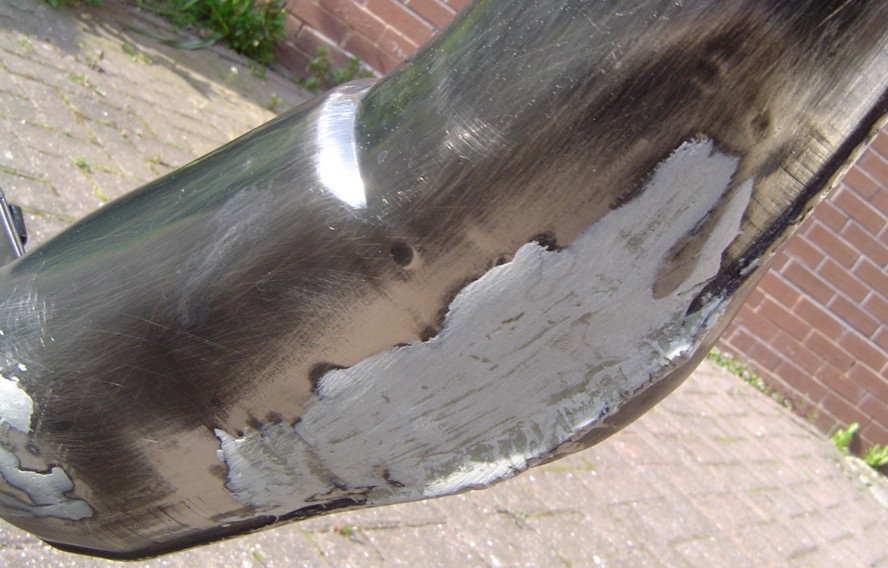
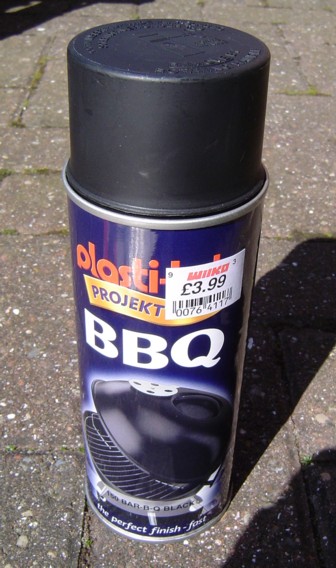
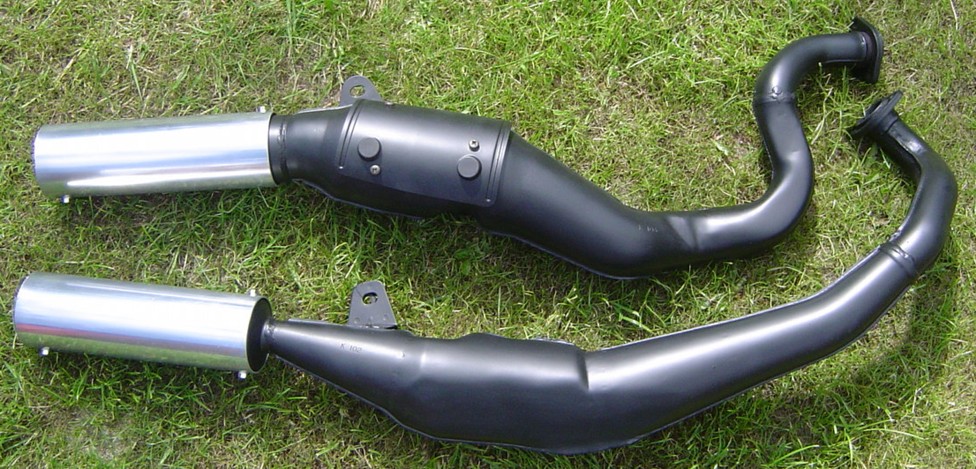
The exhausts on my bike were in a bad state. The lower pipe had crash damage and the upper one had some rust holes
from water thrown up by the rear wheel. I attacked them with a wire brush and then used Chemical Metal to cover the
holes and smooth out the scrapes. I sprayed them with a PlastiKote BBQ aerosol which gives a nice satin black
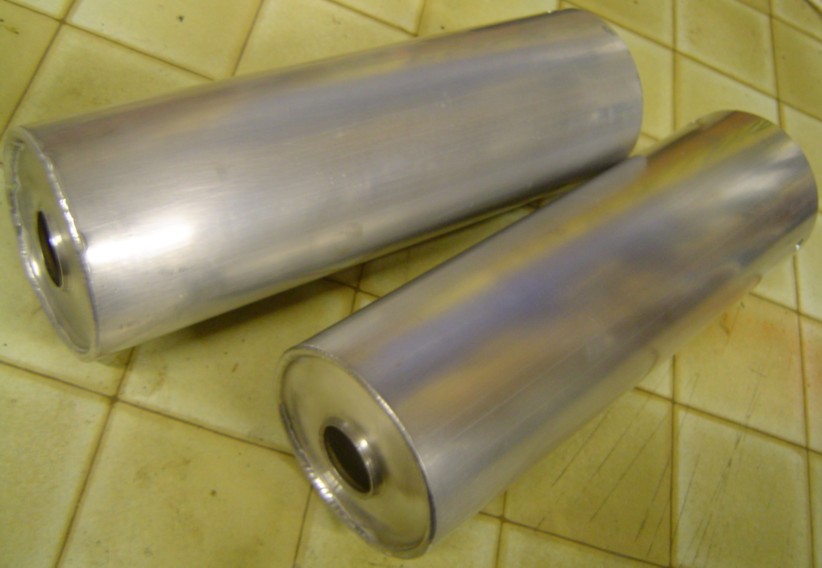
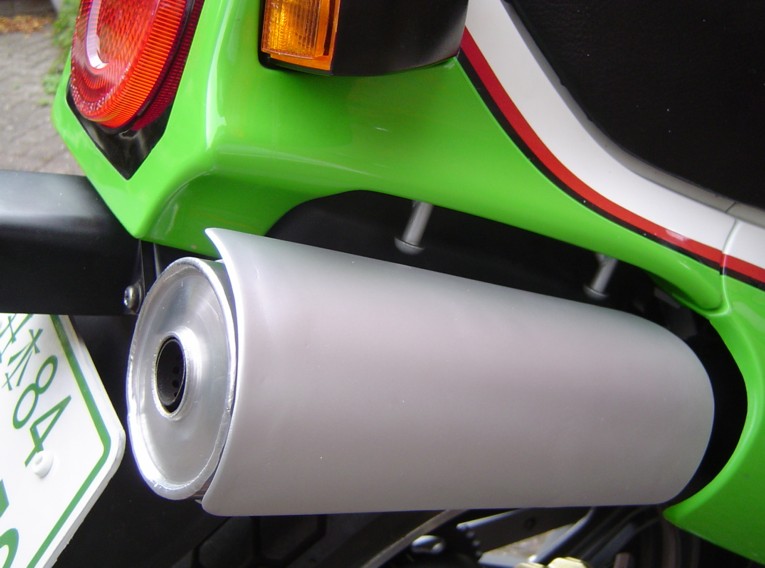
heatproof finish, and of course fitted new end-can sleeves
from Milan Racing. The heatshield on
the upper pipe was sprayed with an ordinary silver aerosol. I'm very pleased with how they turned out, and so far the
finish is proving durable.


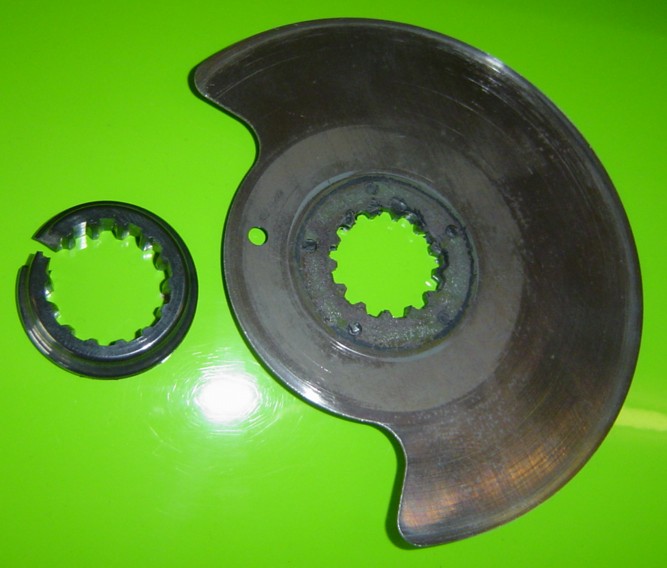
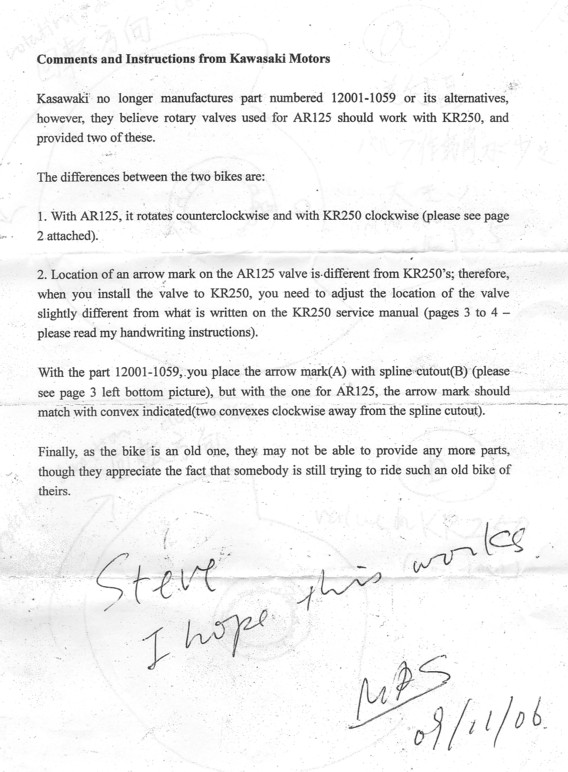
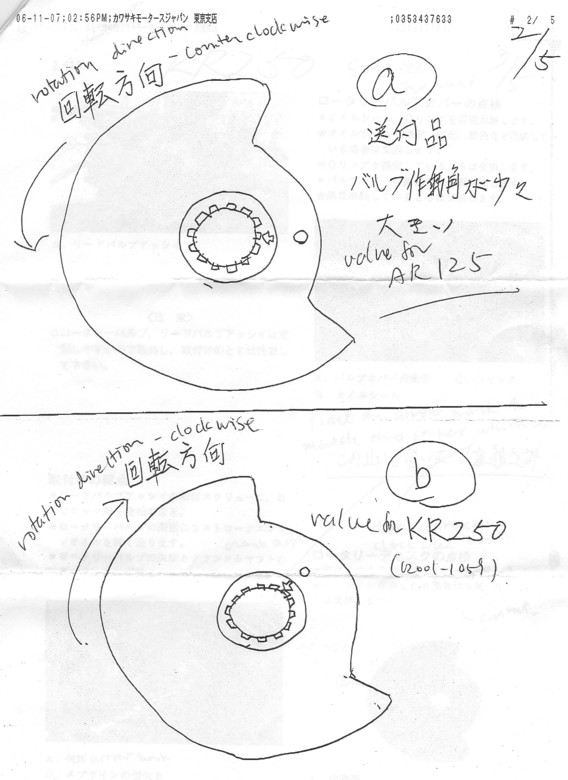
Damaged disc valves are not unknown on KR's. The metal part is tough but the nylon inner bit can tear or lose some
teeth and then you're stuck. New parts are no longer available either. The AR125 used a similar design of
engine and parts for those are much easier to find, but sadly they're not compatible. However, Harry (thanks mate !)
took this idea a bit further and has received the following informal advice from Kawasaki in Japan regarding the use of
AR125 disc valves in KR250's. It appears to be as simple as reversing the disc and then ensuring the timing is
correct, but I've not looked into this in more detail yet. Please let me know if this is helpful to you.


Well, I'm impressed, and determined to have a crack (!) at one of my own damaged panels now. Big thanks are due to
Reg for taking the time to take pictures as he was working and then to write it all up in an easy-to-follow way.
![]() Home Page
History
KR Spec
Info/Links
Events
Servicing
Parts Book
Roadtests
Racing
Tuning
Home Page
History
KR Spec
Info/Links
Events
Servicing
Parts Book
Roadtests
Racing
Tuning
FAQ's
My Diary
KR Owners
Wanted/For Sale
Yahoo Japan
2005 KR Meet
More About Me
Contact